You can achieve some of the most beautiful effects in photography by painting with light. It’s easy to do and you don’t need expensive equipment.
Learn how to paint with light in this tutorial:

What is Painting with Light?
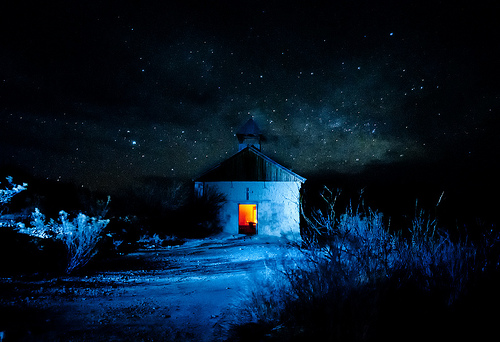
Take a look at the photograph above. The image was not lit with huge movie style lighting rigs.
It was lit by using hand held lighting (such as a flashlight, a battery operated LED lamp or a hand-held strobe). The light you see was ‘painted’ on to the subject. The photographer walked around the area for several minutes shining light everywhere they wanted light to appear.
All the time the shutter on the camera was held open. As individual areas in the shot were lit up, the camera ‘saw’ this light and recorded that part of the image. Over the space of a few minutes all the individual areas joined up in the exposure to form this beautiful image.
This is why it’s called ‘painting with light’. As the photographer you feel like you’re painting — stroking on bits of color here and here.
Light painting techniques require a little practice. Most people can quickly learn to paint with light and achieve beautiful images. Your very first image may well be so good that you’ll be hooked on the technique!
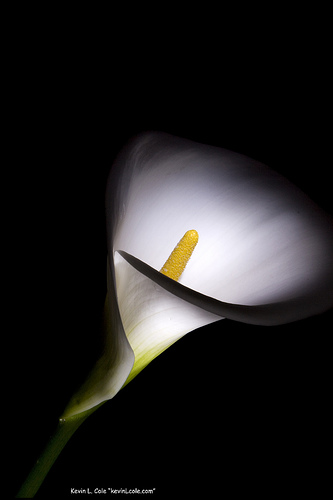
You are not limited to painting with light outside either – in a dark bedroom you can produce beautiful images like this:

In this image a 7 LED flashlight was used. A black paper cone was taped over the flashlight to stop too much light spilling out. The cone had a small hole in the end to allow some of the light to escape. The beam of light was shone over the lily, gently painting in the detail over the space of a few minutes.
How to Paint With Light
You’re going to be allowing your camera or phone to capture light over many seconds or even minutes. So you’ll definitely need a tripod otherwise your photos will show blur.
You’ll need darkness or very dim conditions. Even the smallest amount of light will be amplified because of the very long exposure. You’ll be amazed how much light comes through a bedroom window – or under a door – in a room that you think is dark. If you don’t have lightproof blinds, night-time is probably the best time to give this a try. Of course, sometimes you want a small amount of light to be seen – a dim, dusky sky can become a beautiful blue given a long enough exposure. Did you notice the stars in the photo at the top?
One of the shutter settings on your DSLR camera will be marked ‘B‘. This stands for ‘Bulb’ and will hold the shutter open for as long as the shutter release is pressed. For this reason a cable release is a good idea – it will stop the camera moving while your finger is holding the shutter release open.
Using a cable release whenever you paint with light is a good idea. Ensure yours allows you to hold the shutter open for as long you need. Some cable releases have a setting that keeps the shutter open with the first press and closes it again with the second.
If your camera has a mode for it, your assistant can watch the screen as the exposure is made – telling you which areas need more light as you paint. Otherwise it’ll be more trial and error.
Tips for Painting with Light
- Ensure the area you are capturing is dark. When you paint with light any light source that is there for the whole exposure will almost certainly burn out and cause annoying bright areas in your image.
- Don’t stand in a way that will block the light reaching your camera. If you do you run the risk of having your own silhouette recorded in the image – which could look ghostly and amateur (of course, you might want to produce ‘ghosts’!).
- Ensure you keep the light source pointing away from the camera to prevent it showing up in the final image. If you don’t you’ll see streaks of light wherever your light source could be seen. Sometimes you want this – you can draw shapes, letters and patterns (see the video below).
- You may get better results if you limit your exposures to around 2 or 3 minutes. Longer than that and you may start to see colored pixels in the dark areas of your image (noise). Some cameras are more prone to it than others and it can be cleaned-up using Photoshop.
- Make sure you’re safe
- If you do this outside:
- Check out the area in the light so you know the terrain well as your night vision will be destroyed every time you turn on your flashlight or fire your flashgun.
- Go with a trusted friend for all the obvious reasons – plus they can help you with the cable release.
Not in This Painting with Light Tutorial!
If you want to see some really impressive animated light painting techniques, take a look at this short movie. Here they have deliberately pointed a flashlight at the camera to draw shapes and patterns. You can even paint with light using a smartphone (such as the iPhone).

I couldn’t refrain from commenting. Very well written!
Superb blog you have here but I was curious if you knew of any message boards that cover the same topics discussed in this article? I’d really like to be a part of community where I can get comments from other experienced people that share the same interest. If you have any recommendations, please let me know. Thanks!