A beginner portrait photographer may think they need to buy a lot of expensive studio equipment to produce dramatic lighting. This is not the case — one light is all you need!
Whether you use a bare bulb or a hand-held strobe modern photographers can produce stunning images with just a little thought.
The effectiveness of using one light is often due to the extreme contrast that is seen when the effect of the single light source falls off in to shadow (see below).
Placing the light near to the camera flattens detail on the subject’s face and is used, to an extreme, in some beauty and fashion shoots where a ‘ring flash’ destroys wrinkles and adds an attractive highlight in a person’s eyes.
At the other extreme is the ‘rim lighting’ effect that’s achieved when a light is placed behind the subject and brushes past their features before reaching the camera.
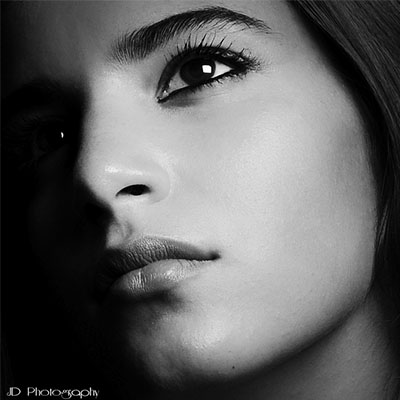
Often, when we talk about one light photography, we imagine the stunning high contrast effects that many photographers aim for. Here is one such example from photographer Jhong Dizon:

This is evidently a studio based portrait and the large, square highlight in the model’s eye suggests that a professional studio flash with attachment was used.
However you don’t need a studio. A simple, cheap hand-held strobe (flash gun) will lift your images (especially those taken at dusk or night-time). A hand-held strobe placed to the side of the camera (fired via an extension cable from your camera’s hotshoe) can brighten the face and eyes and lift an otherwise dead shot to something that’s interesting.
Notice how in this next shot some of the natural light from the background has been recorded.

The camera’s shutter speed has been left open long enough to record the background. This adds interest and is often a good idea. Notice how soft the image is — most of that is probably there courtesy of Adobe Photoshop but be aware the choosing a slow shutter speed can result in blurring should the camera or subject move. You can prevent camera movement with a tripod.
Reflectors
The work of the painter Rembrandt is often recognized by his use of a directional light source (often a window) with detail still being seen in the shadow areas. This effect can be achieved using just one light — and a reflector.
Reflectors can be easily made using pieces of paper, foil or cloth. Normally white or silver they bounce light back in to a photograph. Placed so that it catches some of the light spilled by your single bulb or strobe, a reflector will reduce the contrast of your lighting and lift the shadows.
Experiment with the position of your reflector. Try placing it below the subject for a natural look or on the opposite side to your light source to bounce a great deal of light back in to the shot. Be careful not to over do it as your viewer will detect light coming from unusual directions and the result will be less natural.
If you have tips for using one bulb or examples of stunning images, why not comment below…
Useful tips and great info! thanks for sharing 🙂