Shooting in low light is an opportunity to be creative. Check out these tips for overcoming the technical problems and create something beautiful tonight.

So let’s start with the basics then move on to the more advanced techniques further on down the page…
Increase the ISO Setting
In the ‘good old days’ of film photography the only way you could up the sensitivity of your film was to develop the entire roll of film (between 10 and 36 shots, depending on the type of film and camera) using a special procedure that affected every shot on the roll.
With today’s digital cameras you have the luxury of being able to ‘uprate’ your ISO on a per shot basis. All you do is look through your camera user guide and find out how to change the ISO setting. It’ll normally be set to something like 100 ISO or 200 ISO. The higher the number the more sensitive your camera will be to light.
Advantages: It’s simple to do. You just change the ISO setting on your camera.
Disadvantages: You’ll probably get more ‘noise’ on the shot. The term ‘noise’ describes the speckles of odd colors that tend to appear in shots taken at high ISO. With film cameras we used to see a very similar effect, but for different reasons, and it was called ‘grain’. Although good quality, modern digital cameras are much better at low light photography than older models, it’s still there.
That said, noise adds atmosphere and is sometimes deliberately added to shots for this reason. Professional photo-editing software, such as Adobe Photoshop, has noise reduction filters that can reduce this for you.
Open Up the Aperture
So the first tip for shooting in low light is simply to open the aperture to its maximum (that is the lowest number on the dial). This will allow as much light as possible through the lens. When you’re shooting in low light, you really need as much of that light as possible to reach the camera’s image sensing surface.
Beginners: The lens of your camera has a mechanism for adjusting the amount of light that enters the main body of the camera. This is called the ‘aperture’. The dial that controls the aperture is on the barrel of an SLR camera’s lens. It’s marked in units known as f-stops. On a typical lens you’ll see numbers such as f/16, f/11, f/8.0 and f/5.6. As the number goes lower, more light is allowed through the lens.
With some digital cameras you may not be able to manually twist the aperture ring. Instead you’ll set the aperture on the settings screen. Other cameras will require you to switch to ‘Manual‘ mode before you will be able to set the aperture from the lens itself.
With most modern cameras, setting the mode to ‘Aperture Priority‘ will allow you to change the aperture manually and have the camera automatically calculate the correct exposure. With low light photography you may find that your camera does not perform well. You may have to switch to full Manual Mode and adjust both the aperture and shutter speed yourself.
Advantages: you get more light entering your camera
Disadvantages: you’ll have very limited depth of field. You may be fine with this but take it in to account when composting and focusing.
Slow Down the Shutter
If you’re familiar with the settings on your camera and how they work, you’ll know that increasing the shutter setting by 1 f/stop will allow twice as much light to pass in to the camera.
Camera shutters uncover the light sensitive sensors inside a camera for short periods of time. The amount of light that passes in to the camera in 1/500th of a second is twice as much as passes in 1/1000th of a second.
Advantages: Just as with opening your shutter wide, this will let more light in.
Disadvantages: you introduce the possibility of camera shake. Camera shake is a type of blurring on images caused by the camera moving while the image is being recorded. The longer the shutter is open (the longer the image is being recorded) the more chance of the camera moving (even slightly) during the ‘exposure’ and the more chance of camera shake.
How to Reduce Camera Shake
So you’ve slowed your shutter – and you run the risk of camera shake. How do you fix that?
- Use a tripod. A good tripod will hold your camera steady for hours! If you need a 300 second exposure to capture that star trail, a tripod is definitely the way to go. If your camera lens has an anti-camera shake setting, now’s the time to switch it off. These features are great for hand-held shots but can often introduce camera shake when the lens/camera is attached to a tripod.
- Turn on your anti-camera shake feature: some lenses have a feature designed to reduce camera shake. The feature can be pretty impressive. Don’t use this if you’re taking pictures with a tripod, but they can be great for hand-held shots.
- Use a Cable Release (AKA remote release). This is a gadget that attaches to your camera (either using a wire or via radio signals) and allows you to press the shutter without touching your camera. With a tripod mounted camera, a remote release is a must.
Focus Manually
The autofocus systems on most cameras do not fare well in low light conditions. You’ll almost certainly have to switch it off and twist the focusing ring yourself.
Advanced Low Light Photography Tips
Okay. so they were the basic tips. Now to something to move on to once you’ve mastered the basics…
Shoot RAW
With a RAW image you have slightly more ‘dynamic range’. That is – your camera will store more of the detail it captures on the memory card. If you under-expose your image slightly you may be able to ‘rescue’ it later by using your RAW editor to bring out the shadow detail. You should not rely on this – it’s not good practice – but it may just help you gain an extra stop when you need it.
Get a FAST Lens
So we spoke above about opening up the aperture. Lenses have a maximum aperture. This is the aperture at which the lens cannot be opened up any further. Fast lenses have wider apertures than slower lenses. If you are to be taking photographs in low light on a regular basis, you need a lens designed for the job.
To make a lens faster the manufacturer has to use more glass. More glass means more polishing and good design. Faster lenses (of the same focal length) tend to be more expensive than slower lenses. But an f/1.4 lens will make so much difference in low light if you’re used to a f/4.8 lens.
Best Camera for Low Light Photography
If you are going to be doing a lot of low light photography, you are going to have to invest in the right gear.
Paying more for faster lenses is a given.
With digital cameras: the larger the image sensor the more sensitive it tends to be in low light. Check the specification – as this rule can be broken when manufactures (for marketing reasons) decide to increase the number of pixels they put on the sensor.
What we are talking here is full frame 35mm digital SLR cameras. They’ll cost more than cameras with smaller sensors but, so long as you choose wisely, they’ll be worth it for low light photography.
Creative Solutions
Now it’s time to put these techniques to your advantage. Why be frustrated by the problems of shooting in low light – when you can embrace the issue and allow the challenge to help you produce something stunning?
Add Light
Okay, so this is a cheat. If you’re struggling in low light, one solution is to get more of it!
- Can you safely add candles?
- How about table lamps?
- Sometimes all you need is the glow of a cell phone screen to lift your shot.
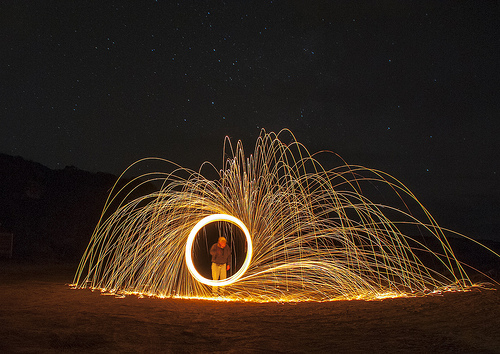
- Consider painting with light. This is a technique where the camera is mounted on a firm tripod with its shutter held open (this setting is normally marked ‘B’ or ‘Bulb’). The photographer then walks in to the darkness holding a flashlight and/or a small flashgun. At appropriate places within the frame, the photographer fires the flashgun or turns on the flashlight and ‘paints’ the scene with light. You have to be careful not to illuminate yourself or position yourself such that your silloette shows up in the shot. Dark clothes are a good idea. But done well painting with light can create some beautiful effects.
Embrace the Blur
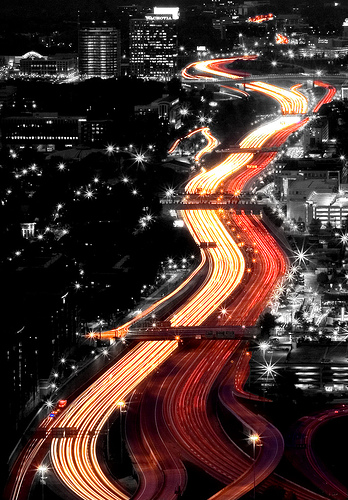
So holding your shutter open for any length of time is almost certainly going to result in some blurring. Anything that moves within the shot will blur. Use this creatively – moving taillights will draw transparent glowing lines across any nighttime shot involving moving vehicles.

I love the way that the cityscape has been made black and white in this shot leaving the vehicle light trails looking like a golden/red river flowing through the city.
Whenever you leave the shutter, still things will be captured; slowly moving things (relative to the camera and exposure time) will blur and fast moving things will fail to be captured at all.
You can use this trick in shopping malls: set your camera on a tripod, adjust your aperture such that your exposure will be 5 minutes or more (use ND filters if needed) and see how the mall appears almost totally empty at the end of the shot. Everyone who moves quickly through the shot will not recorded. The only people who will are those who linger in the frame.
Stars will form trails (if you hold the shutter open for long enough). You can take some very creative shots with this.
Do you like this article? If so, why not click our Like button below…