You have Adobe® Photoshop®, right. So why would you need to use a filter on your DSLR camera?
Well, there are things you can do with certain filters that you just can’t do easily with a photo image editor. And there are some effects that are impossible to achieve unless the light falling upon your digital sensor is modified at the taking stage.
Read on to learn which photographic filters you must still have in your kit bag…
If you think that because you own image editing software you can throw away all of your photographic filters, you’re wrong. They are still essential items for the photographers who want to give themselves more options when they get back to their computer.
In the days before Adobe® Photoshop®, one of the most common uses of a photographic filter in black and white photography was to affect the relationship between various colors. A red filter would darken blue skies and exaggerate the separation between the clouds and sky. Orange and yellow filters would do this too but with more subtle effects.
Today similar results can be achieved using a photo editor, as shown in this comparison taken from the article Getting Started with Beautiful Black and White Photography:

Now look at the same image but converted in to black and white and the effect of various color filters applied:

With color photography, a warming filter would add a subtle golden tint to a color scene. Blue filters could simulate night time or cool a shot without resorting to ‘hand printing’ which could be very expensive.
Today, the artistic expression once gained by using filters is often achieved in an image editor. And, boy, do they work well. It’s now possible to achieve effects with image editors that were impossible before digital photography.
So why bother with filters at all?
There are things that certain filters can do that image editors, even Photoshop® can’t. That’s because certain filters allow you to capture detail that would otherwise be lost to the digital sensor—even before it became a RAW image.
The resulting photo can look far more interesting because certain details that were not noticeable before are suddenly highlighted. However because modern digital cameras are often set to ‘Auto Color Balance’ the effect of subtle photographic filters can be invisible on the final image. This is because the camera may reduce or remove the very color tint you tried to add. Also the effect of subtle filters can often be more easily achieved within a photo editor with the added advantage that you can dial in the precise amount of tint you require – or remove it altogether.
But Why Bother?
Many photographers today neglect learning how to use filters in photography because they rely on manipulating the image with a computer after it has been taken. However, there are results that can be obtained with the best lens filter that cannot be duplicated with digital manipulation. For this reason, it can increase a photographer’s creativity to work with filters.
Polarizing Filters
Polarizing filters are a great example of a situation where you can achieve something at the taking stage that is difficult or impossible to achieve after the photograph has been taken.
Polarizers can create some unique images in landscape photography. Polarizing filters block not color but a property of light that cannot be seen with the human eye. Light from direct sunlight is often ‘polarized’. By putting a polarizing filter on to your camera and rotating it you can reduce or remove some of the polarized light before it enters your camera. The result can be far sharper images and color can be altered in a dramatic way.
Arguably the most impressive use of a polarizing filter is its ability to remove many unwanted reflections and glare in outdoor photographs. The effect of the filter changes depending on the angle it’s at – so the filter is designed so that it can be easily rotated after it’s been attached to the camera in order to achieve the desired results.
Take a look at this before and after image as an example of how well reflections can be removed at the taking stage. The images have not been retouched to obscure or add the missing detail. Instead the reflected light itself has been removed by the polarizing filter allowing the detail underneath to be seen:
")
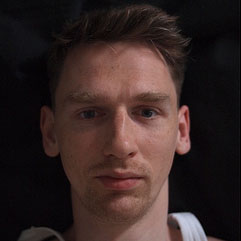
This effect is almost impossible to reproduce using software as the detail is burnt out and missing from the lower photograph. To fill in the detail after the image has been taken will most probably take you a lot of time and the quality of the result will be more about your skill as a retoucher rather than being an accurate record of the true scene. This second example demonstrates the same effect – reflections from this man’s skin have been eliminated by the use of a polarizing filter:

Just to make this clear – a photo editor has not been used to remove the reflections. A polarizing filter has removed the reflections before they reached the camera!
Ultraviolet Filters
Most photograhic filters are named after the color they let pass through the. A red filter, for example, lets red light through. UV filters, on the other hand, block the ‘color’ mentioned in their name. A UV filter blocks UV light; preventing it from passing through your camera lens to the sensor.
Ultraviolet is a form of light that human eyes cannot see. It is further along the rainbow, beyond blue and violet. Many insects can see ultraviolet as can many camera films and electronic sensors. This type of light often has the effect of making a photograph look more blue than we see a scene and so it’s often a good idea to filter it out.
In addition ultraviolet light ‘scatters’ more readily than visible light and so using a UV filter can sharpen your images a little.
Many digital cameras have a UV filter in-built to prevent the camera’s sensor picking up too much of this light. An additional, external, UV filter not only ensures less UV light passes through the lens but also helps to protect the front element of your lens from scratches.

Which would you rather break, a cheap UV filter or an expensive lens?!
Neutral Density Filters
A neutral density (ND) filter looks like a piece of gray glass. It does nothing special other than reduces the amount of light that enters your lens. Put another way, it makes the camera think that the world is darker than it really is. This can be useful when taking photographs in really bright conditions. It allows you to choose longer shutter speeds than would normally be the case for the aperture you’ve chosen to use.
ND filters are usually marked with a number that indicates what fraction of the light coming from the scene will pass through the filter. So an ND4 filter will allow 1/4 of the light to pass. Or, put another way, an ND4 filter will make the scene two stops darker. An ND512 filter will allow just 1/512 of the light to pass therefore blocking nine stops!
High value ND filter are often used to allow photographers to select extremely slow (long) shutter speeds.
If you want to photograph a scene that contains people but you want to remove the people from the shot, today you’d probably opt for Photoshop®: you’d put your camera on a sturdy tripod and take a series of shots while the people in the scene moved around. Then you’d load all the shots in to Photoshop, align layers and then ‘paint out’ all the people leaving an apparently deserted building or scene.
Before image editors, we used Neutral Density filters to achieve this effect.
The trick was to use a very long exposure. Because people tend to move around and the surroundings don’t, it’s possible to make a public place look deserted by using a shutter speed of several minutes. The people blur so much that they cannot be seen at all. (Of course, there is no guarantee that someone won’t stand pretty still looking in to a shop window and end up being seen in the final image – so you may have to be very patient to get the perfect shot!)
Today, Neutral Density filters are still used to achieve effects difficult to achieve in with image editors. In the next photograph we see the effect of blurring the waves of the sea so much they become indistinct and misty. Without a neutral density filter it is often impossible to get a slow enough shutter speed by stopping your lens down enough to achieve this effect.

Color Correction Filters
A color compensating filter will correct the colors in your photo if the colors are being distorted by your light source. This is often achievable using the settings on a digital camera but not possible for a film camera. The advantage of using this kind of filter with a digital camera is that you are not relying on the camera to do the work for you – which is sometimes unpredictable or may not achieve the highest quality. Be careful to ensure that your ‘Auto Color Balance’ setting is switched off – otherwise your camera will automatically ignore the effect of your filter! Testing is the key here.
Diffusion or ‘Softening’ Filter
A diffusion filter is often used in portrait photography. It creates a softened image that has a romantic, hazy look. This type of filter is also helpful when photographing older people as it will blur the appearance of lines and wrinkles. The resulting appearance will be far less harsh than a high definition photograph would be.
However if you have a good photo editor, such as Adobe Photoshop, it may be worth using that instead because of the level of control post-shoot manipulation allows. With post-shoot manipulation you can control exactly how much blur you add, the places where it’s added and the type of blur. A disadvantage of this approach is time – a filter will do the job instantly at the time of taking. With post-shoot manipulation you have to spend the additional time working on your images. Remember that using a diffusion filter is permanent – you can’t undo this later.
Graduated Filters
Graduated filters are helpful if only a part of your image needs to be filtered. Part of this filter is clear and part of it is either neutral (gray) or colored. This can be helpful in certain photographs where you wish to highlight only the sky or only the land. In many situations, the sky is much brighter than the land and the resulting picture will lose detail and drama unless a graduated filter is used. The graduated filter can help balance the effect of too much light in the sky and not enough light on the land resulting in a much better balance. The use of HDR (High Dynamic Range) technique can help you achieve the same effect using a photo editor. Again, this takes time and you may prefer the ‘instant’ effect of using a lens filter.
Types of Camera Filters
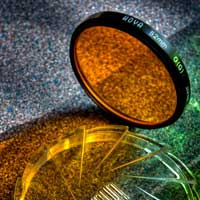
Glass laminate filters are quite common in photography. They are made by sandwiching a colored gel (a piece of colored plastic) in the middle of two layers of glass. This type of filter has the advantage of being relatively cheap to buy but can have several disadvantages including changing color over time and not being as optically flat as more expensive types (possibly resulting in less sharp images).
The best lens filters for photography are made from optical glass that is colored before the glass sets. This type of material can be ground very precisely to produce a very flat surface. In some cases, the glass may also be coated with special chemicals to reduce glare. The ring on the edge of the filter may be made from brass or aluminum.
Summary
Photography filters have gone out of fashion because of our ability to manipulate images after we’ve taken them. Although this is fine most of the time it’s time consuming and the results you get with photo editors don’t always match the quality of result you could get with the educated use of filters. Don’t give up on lens filters. Buy a few and experiment with them. You could be pleasantly surprised. At Photography Incyder Info we would say that as a minimum a good polarizing filter should be in every photographer’s case. Add to that several standard ND filters, a graduated filter or two and a good protective UV filter and these tools that could give you the edge.
Please Share!
If you found this article useful, please share it. Shares help us realize that people like our work and motivate us to write even more great articles like this one!
Your Opinion Matters
We'd love to read what you think about this article. Do you have a comment? Is there something that needs to be added or a fact that's wrong? Please use our Comment box to tell us about it.
Keep Up-to-Date
To have early bird access to our new courses, books and tutorials subscribe to our free newsletter. Don't miss out on our next post — Like our Facebook Page, follow us on Twitter or add us to your circle on Google+. You can also subscribe to our YouTube Channel.
Great simple explanation, thanks much from a budding obsessive enthusiast!
You’re very welcome Paul – thank you for your kind words and for taking the time to leave a comment. I wish you every success with your photography. If you would like me to showcase some of your work then please get in touch. I plan to add some ‘Reader’s Photographs‘ pages soon. You would retain all copyright in the images but license us to use them on the site.
Found this really interesting!