Color photography has become a predominant type of photography since the first three color image was taken in 1861. Color photography presented a wonderful new opportunity for photographers, showing life, people, things and events as majority of people see them. Yet, monochrome photographs continue to be taken and have remained a staple in the tools of the trade for many amateur and professional photographers even in this age of digital imaging. Learn more about beautiful black and white photography and the most important tricks and techniques that can be used to enhance, improve and create unforgettable images.
How to Take Black and White Photos
Certain techniques work for images taken with either film or digital cameras. However, for beginners who are still learning the ropes, it is often better to start with a digital camera. With digital imagery, you can edit, use different settings, correct brightness and reduce noise and crop the picture. Plus, if you take a bad photo, you can always delete it. With film, you will have to live with that photo and probably waste several good rolls of film in the process. For beginners, a basic digital camera will be cheaper in the long run. To learn how to take black and white photos in the best way possible, here are tips you can use:
1. Get a RAW image
A RAW image file can be likened to a photographic negative. What you get are untouched pixels exactly as they are captured by the camera’s sensor. It’s the information that the camera uses after taking a photo that will normally be converted into either a TIFF or JPEG image.
Because a RAW image is untouched and has not lost any of the data captured by the camera, it offers more possibilities in terms of manipulation and control later. A RAW image file will tend to have both more image detail and more color detail than a JPEG file. Not all cameras offer this format though but it’s a good idea to give it a try if your camera has it.
Once you have the RAW image you would normally use a photo editor (such as Adobe Photoshop) to convert the it in to a JPEG for general distribution. JPEGs have the advantage of being smaller in file size. In addition almost every home computer can view JPEGs were as specialist software is needed to view RAW image files.
If your camera is not capable of shooting RAW photo files opt to shoot in color instead. Capture the image you want to take and check the positioning of the elements in it. You can convert this image to monochrome (black and white) later and, because you didn’t let the camera remove the color information, you have more control over how your image will finally look (more below) as you will have more control over the way your image is converted.
2. Play with the light and shade
Photography is all about capturing light, so focusing on how well this is done will help you become a better photographer. Monochrome photography relies on the presence of light and shade in order to produce a coherent image. Before taking a picture, consider the type of pictures you want to take and the lighting options available. Keep in mind that soft, directionless lighting tends to produces more somber image while light that comes from a particular direction tends to produce a higher contrast image.

3. Watch the tone
Just because you will be shooting images without color does not mean you should disregard it completely. Different colors and shades appear differently even in monochrome photography. No color is present but there will be differences in tone, which is the lightness and darkness of an object. Some colors reproduce as exactly the same shade of gray when seen in black and white.
Check out this photograph:

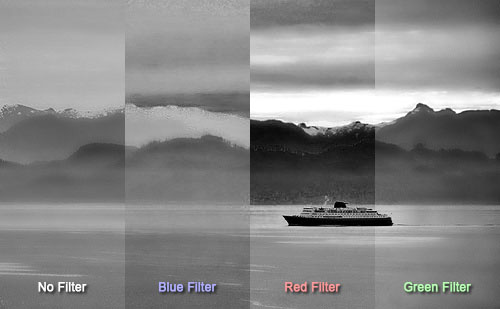
Now look at the same image but converted in to black and white. The JPEG color version was used together with a photo editor to apply various different colored filters.

Notice how the use of filters significantly affects how the tones are represented in each monochrome version. The effect of each filter is to make its own color appear lighter in the black and white version and, at the same time, darken the appearance of its complementary color.
4. Draw the eye
Good contrast and a number of tones in your photos will allow you to create an interesting shot. However, make sure to use all the elements to create a focal point – the specific image or area in the photograph that will draw the eye.

5. Mind the details
Monochrome photography can produce exquisite details and show off textures just with the use of contrast alone. Without color, images can be enhanced and certain details highlighted. Check the frame to determine how best to show the details and bring these out using tone and contrast.
6. Compose your image
As mentioned earlier, it is a good idea to create a focal point and this can be done using composition. By framing the shot, you can manipulate the placement of the objects in order to create a picture that can tell a story or evoke an emotion.
Taking Black and White Photos with a Touch of Color
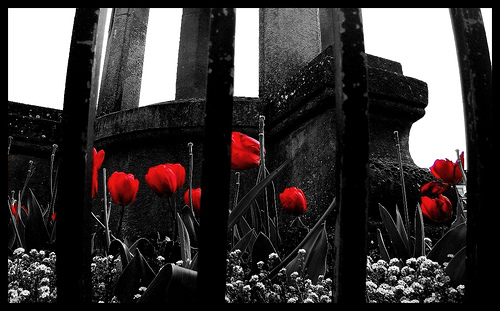
In the early days, photos were colorized by hand but thanks to software such as Photoshop, adding a hint of color to a monochrome image is a lot easier and less messy. With Photoshop and other similar image editing programs, specific objects or areas in a photo can be selected and colorized. The technique is quick and efficient, allowing the photographer total control over the color, shade, hue and intensity of the added color. You can add color onto the digital monochrome image or utilize two layered color images, select the object you wish to colorize and decrease the saturation. The chosen object will retain its color while the rest of the photograph will appear in black and white.
