White balance is something many beginners struggle with. The main problem with understanding white balance is that the goal is always moving – making it hard for us to realize what’s going on. This article explains white balance in photography simply, by starting at the beginning.

Automatic White Balance
Most modern digital cameras come shipped with their automatic white balance setting set. Unless you turn it off, every photograph you take will be assessed by the camera for white balance and you’re probably unaware it’s happening.
To add to the confusion our own brains have an automatic white balance feature which prevents us from noticing that the color of the light around us constantly changes.
So let’s start at the beginning:
White light is not white.
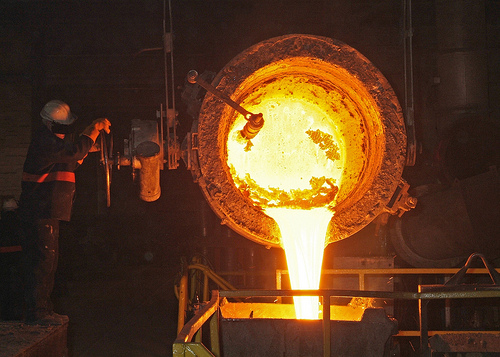
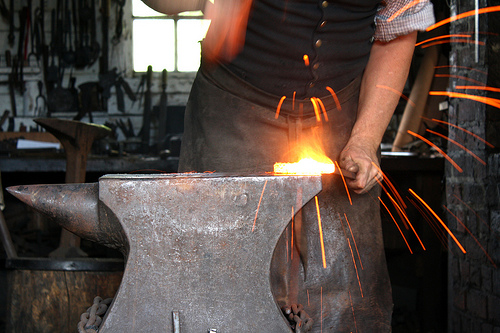
Take a lump of metal and heat it up. Make it hotter and hotter. To begin with it won’t change much – it’ll look like a lump of metal. After a while it will begin to glow – red at first with the heat of the forge – imagine images of a Blacksmith pounding a horseshoe in to shape and you’ll know what I mean.

The hotter the metal is heated the more yellow it glows becomes bright yellowy-white hot as seen in the photograph at the top of this page and this photograph of metal being struck on an anvil (notice how the sparks are cooler and glow red hot).
You might be surprised to learn that this is how a traditional electric light bulb works. Inside the glass bulb is a very thin coil of metal wire which has so much electricity running through it that it becomes very hot and glows yellowy-white hot.
Now the human eye and brain has a feature that adjusts the colors we see. If a scene is too yellow, our brains take away some of the yellow so that things appear more natural. If a scene is too blue it will take away some of that blue. The effect is that, within certain limits, we usually see the brightest object within a scene as white – even if that color is actually full of yellow or blue.
So our traditional electric light bulb isn’t pure white at all. It’s white with quite a lot of yellow in it.
Understanding that what we see as white can be a whole range of colors between quite yellow to very blue and you’ll be closer to understanding color balance.
The sun when it first rises over the horizon in the morning can be quite red/orange/yellow in color. By mid-morning it’s more white. By lunchtime and early afternoon it’s really quite blue before making its way back to being reddish/yellow by sunset.
Most of the time we never notice these changes in the objects around is but if you look in to the shadows or look from a room in your house to the outside you will, for a very short time, notice these differences. What makes understanding white balance tricky is that our brains very quickly change what we see and so everything looks normal again.
Color Temperature
So cold metal doesn’t glow. Red hot metal glows red. The hotter the metal becomes, the less red it glows until it becomes bright will a yellow cast. You see that the temperature of the metal has some influence on what color it is. This is the idea behind color temperature. You can describe some colors by the temperature that a specific thing has to be heated up to before it glows at that color.
The scientific definition of color temperature doesn’t involve heating a piece of iron – but the idea is the same. Because what is heated is different the colors are different. In the case of Color Temperature: hotter means bluer; colder means less blue and more yellow.
So throughout the day the color of the light around is changes. Move from outside to a room lit by a traditional light bulb and the color of the light in the room is very different. Move to an office building or a room lit by energy saving bulbs and there is a major difference again.
Putting Things in to Practice
So now you know the theory. White isn’t white.
Your brain automatically adjusts what you see so that you still see colors pretty accurately even if the color of the light around you changes.
Your camera does the same thing – if automatic white balance is turned on.
Unfortunately your camera may sometimes get things wrong.
This is why understanding white balance can be useful to you.
Preset White Balance Settings
Most digital cameras have three modes for white balance.
- Automatic
- Preset
- Manual
Automatic is pretty self-explanatory. Your camera will do its best to work out what color the light falling on your scene is and adjust all the colors in the picture to give a realistic result. Most people leave their cameras on this setting all the time. However if your camera gets this wrong your photo will have a color cast – it will appear to be unrealistically blue or yellow. You might also find that objects in the shadows are strangely colored. That’s when the other two modes come in to play.
Preset: The camera manufacturer has pre-programmed the colors found in the light of common scenes. An example is “Tungsten” (or “Incandescent”) for rooms lit by traditional light bulbs. Other examples include “Cloudy” for taking pictures outside on a cloudy day; “Florescent” for office strip lighting and “Flash” for when you work with studio strobe lights or camera mounted flash.
Manual: requires you to own an 18% grey card for photography. This is a special type of card that is colored a very particular type of gray. The gray is also special in that it is known how it reflects all the colors of the rainbow. You can’t use any old piece of gray card. In manual color balance mode you put your 18% grey card in to the scene, switch your camera to manual color balance mode and follow the instructions. This normally involves zooming in on the card so that it fills the frame and giving your camera time to calculate the color balance. Manual mode is useful when automatic white balance isn’t giving you good colors and the appropriate preset isn’t either.
Can’t I Just Change it Later?
Maybe but most cameras convert images to the JPEG format before saving them to your memory card. When they do this they discard much of the detail that’s needed to accurately adjust the color temperature once you’re home. Unless you shoot RAW you could be stuck with a very odd looking color cast.
If your camera is able to record in RAW format, and you choose it, then you can adjust the color temperature later. With RAW format the camera keeps all of the detail it captured when you pressed the shutter release and you’ll be able to choose have a good range of adjustments later.
Hopefully you now understand color balance. It’s important to get it right – especially if you take photographs using JPEG format.
Terminology

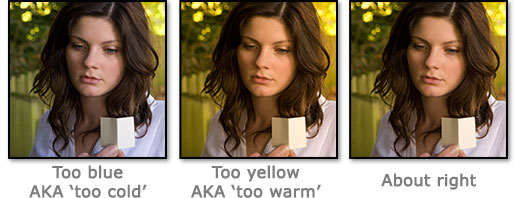
When a photographer is assessing white balance they may look at a shot and say it’s “too cold” or “too warm”. They are referring directly to the color temperature of the shot. Too cold means there is too much blue. Too warm means too much yellow.
Personal Preference
It should be said that a great deal of personal preference involved in assessing white balance. Although choosing the ‘correct’ white balance setting should result in the image being reproduced in an exactly accurate manner – photographers are at liberty to make their photographs warm or cold for creative reasons. A snow scene, for example, may benefit from being made cold to convey the feeling of physical coldness. A photograph of people sitting around a glowing log fire would look so much better if made to be warm rather than neutral.
Screen Calibration
Another vital aspect of assessing white balance on screen is the calibration of your monitor.
